Programming
Our team uses the RobotC platform to program our robot.
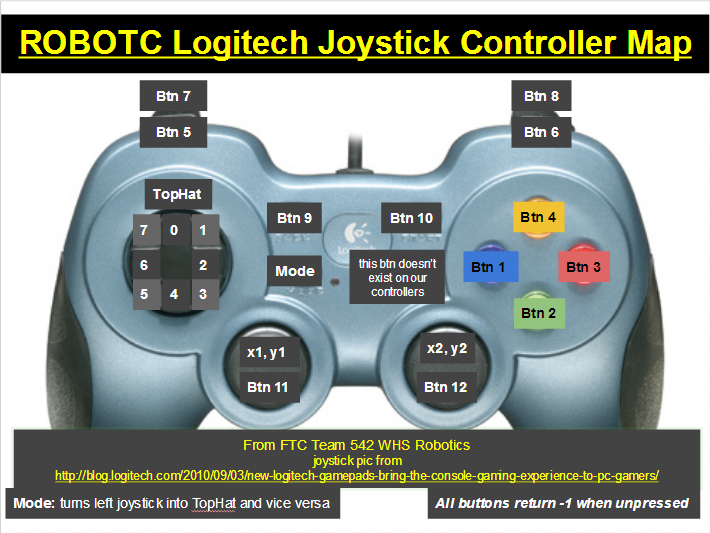
We compiled the following ROBOTC Logitech Joystick Controller Map to make tele-op programming easier for ourselves and other teams:
How to refer to joystick controls:
Button Example:
if(Joy1Btn(5)) //checks joystick controller 1's button 5.
{
//code here if pressed
}
else
{
//code here if not pressed
}
//Note that joy1Btn(5) is a function that returns a bool: true or false. The parameter for the function is the number of the button to be checked.
Top Hat Example:
if(joystick.joy1_TopHat == -1) //checks joystick controller 1's top hat
{
//code here if no buttons on top hat are pressed
}
//joystick.joy1_TopHat is a variable that stores an int from -1 to 7.
Joystick Example:
motor[leftDrive] = joystick.joy2_y1;
//sets motor power to joystick controller 2's left joystick y position.
//joystick.joy2_y1 is a variable that stores an int from -127 to 128.
Debugging
- A great way of debugging is to display analyzed data so that it is easier to interpret. For example, you could create a graphing program to visualize information. This helps to better understand what's going on in your Robot's brain for bug diagnosis or other program changes. Make effective use of feedback!
- Remember to make use of the RobotC Debugger Windows. You can access them from the Robot Tab, under the Debugger Windows dropdown.
- Use the NXT LCD Display if you need to check for specific outputs, such as the value of local variables.
- Consider using the PlayTone function to check if certain pieces of code are run if you cannot use the NXT LCD Display.
Tips & Reminders
- You can find a lot of things you want to learn in the sample programs folder, accessible under File -> Open Sample Program.
- Always remember to have a task main() in your program to make sure it can actually run. The NXT will only run whatever is in the task main.
- Do check your understanding of data types, and how manipulating them via operations and functions may change them.
- If you're naming your motors, servos, sensors, etc., it's good practice to pair the name with the part name that you're renaming. (for example: armServo, leftDrive, rightDrive, clawMot)
- If you're using a joystick in your program, remember to have #include "JoystickDriver.c" outside the task main() and have getJoystickSettings(joystick) in a while loop.
- You can continue a "if" statement by having an "else if" or another "if".
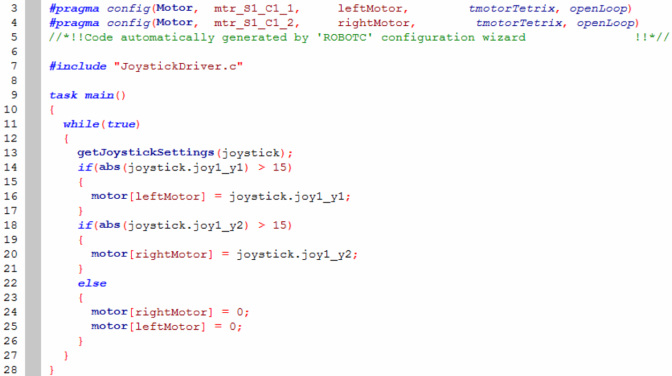
This is an example of what a teleop program could look like.
- The value 15 is added as a threshold so that when the joystick is not moved, the drive train will not move if the joystick is incorrectly aligned back to 0.
- Be sure to check joystick.joy1_y1, not joystick.joy1_x1! The latter checks the x position of the joystick, while you want the y position (unless you want to drive sideways).
